Tuesday, September 6, 2011

Happy Birthday Crochet Cloths!

So. I've been crafty even if I haven't managed to be bloggy... (hmm, bloggy isn't quite a word, but you catch my drift.

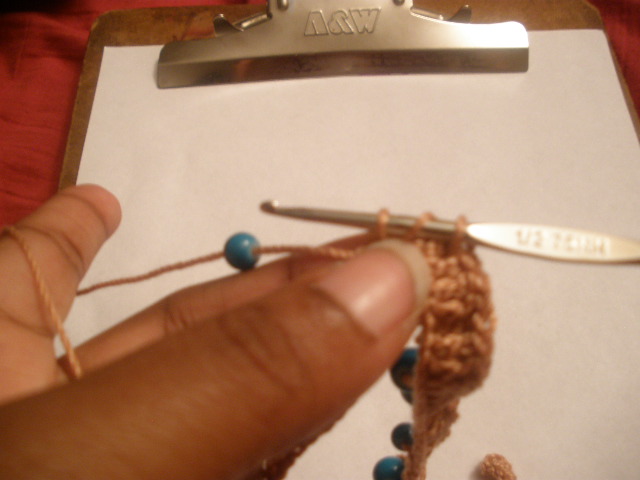
Just this past weekend, I made birthday gift for a great friend and colleague of mine:


I 've been sneezing and coughing (I got a bug from the kid, I'm sure) and didn't finish it until just before I walked out the door to work at 7:30 this morning. Sorry for the bad lighting. 

I made four washcloths and a scrubby from free patterns I found on ravelry.com and around the web. I mostly just started the patterns, then finished off the edges in my own way. I liked the way the borders turned out. For all but one, I single crocheted around the square, then I doubled crocheted again. For two I did this twice:
The colors are a bit off. The pictures below are more accurate.

I used Lily Sugar and Cream Solids and Self Striping. I'll admit, I didn't much like the feel of crocheting with cotton, but the resulting cloths were super soft (wonder how that happened?) and seemed really sturdy. I've crocheted for a while now and must admit -- these are my very first dish/wash cloths. I don't know why I never made any before, perhaps because I was never using 100% cotton?

I also made her a handmade card with a piece of white card stock and markers. I found the template for the flower here - http://www.lets-make-greeting-cards.com/how-to-make-paper-flowers.html   As always, I just did my own thing instead of following the whole tutorial. On the inside, I wrote a birthday wish and on the back I gave instructions on how to care for the cloths.

I tied it all up with a ribbon:

See the tissue paper flag banner in the background? I'm trying out ideas for Baby H's first birthday party!

She really seemed to like them and I'm really happy about that. I love giving handmade gifts. I think people appreciate when someone takes the time to make them something.

I hope that you too will find some joy in giving a little of your talents to others. 
As for me, I plan to devote a bit of craft time each month to gift and charity crafting.

All the best, 
~Dee

Thursday, August 25, 2011

Easy Crochet Wrap Bracelet #1


Easy Crochet Wrap Bracelet
Wrap bracelets are everywhere. I went to three different stores last weekend to buy gifts for friends and there were so many of these extra-long bracelets out there. I'm going to my first ever craft show (I've sold a few items at a show, but this will be my first foray into full out selling) and decided to make a few prototype crochet bracelets.

Chan Luu Wrap Bracelet Polyvore.com

 I love the look of these bracelets and so for the next few posts here I will show you what I came up with . Here's the really simple pattern for the Easy Crochet Wrap Bracelet #1 (at the beginning of this post).


Easy Crochet Wrap Bracelet #1

Please note: You can make this pattern for any reason, even to sell. But I reserve the copyright of the pattern and you should link back to this original post if you blog about this pattern or sell it online. 

Skills Needed to Complete this Pattern: You must be able to chain, single crochet, double crochet,  half double crochet, and be able to string beads onto your thread. A great resource for the basic crochet stitches is http://www.dummies.com/how-to/crafts-hobbies/Crocheting.html .

Materials Needed:
less than one oz of Crochet Cotton or Nylon in size 3. (You can use a lighter weight thread or heavier yarn, but you will have to adjust your starting chain to make it fit your needs.)
Size 1 crochet hook (again you can use a different size, but that will change your gauge)
approx. 2 dozen beads (my version has 26)
A yarn needle (that can slip through your bead holes, this is possible the trickiest bit of the whole pattern. Beads are finicky.)


Super Easy Instructions
Prep: Thread your beads onto your thread. It is better to put too many beads on, than too few.  For now, let the beads stay close to the skein and out of the way of your foundation chain. (explained below)


1: Make a foundation chain long enough to wrap around you wrist loosely at least 5 times.

2: Double chain in the first 10 chains of the foundation chain.  Then, *yarn over insert into the next stitch of the foundation chain, pull up a loop (3 loops on hook), then slide a bead down to the hook. Yarn over pull through 2 loops, yarn over and pull through last two loops to complete the double chain. Double chain in the next 4 stitches of the foundation chain* repeat from star for 2/3rds of the length of your foundation chain.
3. When you get 2/3rds done, stop adding beads and double chains. Instead, single chain into the rest of the stitches of the foundation chain until you get to the 5th stitch from the end. There add a bead by pulling up a loop in the stitch, push down a bead and then complete the single stitch by yarning over and pulling through both loops on the hook. This will serve as the bead closure for the end of the bracelet.


4. Complete the row with single stitches.

5. You're pretty much done! I decided to add a little tassel to the end of my bracelet by knotting the end threads together (instead of weaving them back in) and knotting on a few additional pieces of thread.

And you're done!

To fit the bracelet, just wrap it around your wrist and push the first bead and last bead into the opening of one of the double chains of the bracelet. It may take a few tries to get it to fall where you want it too, but don't try to make it perfect. Part of the wrap bracelet appeal is its unstructured look.

backhand view
back of the wrist view


Please let me know (show me pictures!) if you make this bracelet!
My goal with the crochet patterns I share is always to share something that will bring joy to any who come across this page. Do let me know if you have questions.

See you soon with another wrap bracelet pattern!

~Dee

I linked up at:

The Girl Creative


The Girl Creative

Tuesday, August 16, 2011

Hey Look: My Scarf Design is sorta like Donna Karan Sweater featured in Allure

Can you see the similarities?


My Lattice Stitch Summer Scarf (wrapped around my arm)
Lauren Conrad, Allure Magazine May 2011
I was dusting, my least favorite chore, especially since we've been away for four days and I was gone a week before that- when I picked up the May issue of Allure magazine and thought, that sweater looks familiar. 

We get quite a few magazines at our house. They are all gifts from a great friend of mine who started subscriptions for me when I was pregnant and not going out much. They proved to be a great escape in those first few months after Baby H arrived. 

I don't know much about Lauren Conrad, I tried to watch one episode of the Hills and didn't make it through the first 2 minutes. A friend tells me she's the least objectionable person from the show, I'll take her word for it. 

I do know a bit about Donna Karan. There hasn't been a season since I started being fashion-interested (I used to be fashion-obsessed but that has dulled since I've gotten craft-obsessed) that I haven't loved her Ready to Wear lines. Both her high end label and the more affordable (if you think 100 buck shirts are affordable) DKNY line fit with my style preferences - sleek, modern, tailored lines and menswear inspired. 

When I found out the sweater Conrad was wearing on the Allure cover was a hemp knit for Donna Karan I'll admit I was a bit surprised. It's a bit more fussy and girly than her usual. But it's still great looking.
And it ought to be... for $895! That's right, friends! The hemp knit cover up sweater pictured above retailed for nearly 900 smackers. I'm all for spending a little money on a good, staple piece of clothing, but that's exorbitant. Surely if it were made by hand with lots of care, I could venture to say that some well to do person could pay a few hundred dollars for a nice sweater -- but I can't imagine $900.  

The great thing is, if I ever want a sweater like the one pictured, I think I might be able to make a pretty good version and in only a few nights. I have a friend who will be honeymooning in Hawaii this winter, who I just might try to make this for - if I can find the time! 

I think that may be the thing I like most about working on my crochet skills and other handiwork, the potential of it exceeds my purchasing power! 

Laterz, 
~Dee

Monday, August 15, 2011

On My Hook: Antique Corticelli Crochet Edging

Here's what I've had on my hook for the last few days while traveling non-stop:

It is my version of an edging found in Coritcelli's Lessons in Crochet Book 1 from 1916.  The book and many other antique needlework books and pamphlets are available for free at http://antiquepatternlibrary.org . If you knit, crochet, tat, embroider or just like needlecrafts, this site will have you spending hours ohhing and ahhing. 

I got the idea to try my hand at some of the antique stitches and patterns from Fatima over at Crochetology . Her blog is one of my favorites. She makes the coolest crochet wearables and is committed to taking what seem to be difficult patterns and stitches and making them accessible. Her pattern hacks and jewelry designs inspire me. Hers isn't your Grandma's crochet! I'm hoping to use some of her jewelry techniques to create some one of a kind gifts this Fall.

On her blog, she worked through several of the antique edging and stitches found at the Antique Pattern Library. I was inspired to do the same when I realized that I was going to be spending hours upon hours on planes and needed something small, yet engaging to do. 

I picked Corticelli Edging 318C - mostly because it had a set of directions I thought I understood.  I used Aunt Lydia's Fashion Crochet Thread size 3 and a 7/1.65 hook. This thread and hook are a bit larger than the original pattern recommended so the size of my stitches are too, but I knew that when I started. 

I didn't count my starting chain, but as I sat on the plane waiting for take off, I chained out a length that would wrap around my wrist, not knowing then what I would make of the edging swatch. When I finished the edging I decided it would be an interesting cuff and doubled it, by crocheting the entire pattern (with the exception of the foundation row of trebles) again under the foundation row. Making the top and bottom mirror one another. Maybe hard to explain, but not complicated, I promise.

You'll notice that my fabric is a lot looser than the original edging. In part this is because of the larger needle and thread, but I also think that it has to do with my hand gauge. I didn't bother to make the stitches tight and even, rather I wanted to produce a flexible fabric. 


The swatch ends with a curve because of how the original pattern repeats. I thought of shortening the last fan to make it square, but then I decided that I really liked the scalloped edge. 


 While I loved the way my doubled edging turned out, I totally FLUBBED the star flower motif I tried to make from the same book. I did the repeats from memory and let's just say, my memory ain't what it used to be! LOL.  I've found that many of the motif patterns are difficult in the older pattern books. There are plenty of crocheters out there who've written about how to understand and simplify the patterns. I should have looked at the picture and went with my eyes instead of my poor pattern comprehension skills!

Note to self (and you too) : Trust What You See!

I haven't yet decided how to complete the doubled edging.

A frilly cuff maybe?
 It isn't my normal style. I'm more urban/modern than Victorian lace (although I do love the antique pave' setting of the engagement ring my awesome hubby picked out for me), but I think that with the right clasp and embellishments, this might work.

There's only one potential problem:

The ends! Because they are so frilly and not a perfect straight edge and because the fabric is really flexible, I'm not sure what sort of clasp would work to keep the edges from folding up like they are doing in the picture above. Suggestions?


I hope this post will encourage you to give the older patterns a try. Go visit Crochetology (I don't know her by the way, I just love her site) and then go make something incredible.


Until next time, which will be sooner than later, I promise ---

~Dee

Monday, June 27, 2011

Crocheted Figurines?

So, I must admit, I have been feverishly working on new dolls and I've run into yet another set of inspiring/ensnaring/troubling potential rooms to grow my doll making.

The Problem: Crochet Isn't for Every Office


I have a great friend who wanted a desk doll (what I call the crochet dolls I make) but she had a problem with the dolls I make (and not just that I am not currently taking custom orders ...or any orders). Here's our convo:

Her: You know, I'd really love one of those desk doll thingys you made for x,y and z but...
Me: But?
Her: Yeah, I couldn't keep one of those at work. My desk gets way too dusty. (She works in an old office building and sifts through old records for a living.)
Me: Hmm...
Her: If you ever make one out of something else... like a figurine, but not like a little kid or precious moments thing or something, an adult thing like the crochet ones, I'd be willing to pay you BIG money.

Big Money? My ears perked up. I don't make the things I make expecting money (although it would be nice one day). But the rest of what she said had been irking me about the dolls since I first started making them. 

Am I making crochet figurines?
I had another friend tell me that they were more like crochet sculpture or a figurine than dolls. But like my friend with the dusty office, all I can really think of when people say figurine are glass unicorns or Precious Moments babies:


from ecrater.com

from preciousmoments.com
Honestly, I don't see anything wrong with precious babies and glass mythical unicorns, but they aren't really what I'm going for. 

I started making the dolls in preparation to making doll friends for my little one, so that she could have play unique stuffed. Once I got that form down, I moved on to making amirgurumi and the dolls. 

I make dolls with hug afros -- self and friend reflecting little women dolls. They don't do much but sit and look pretty on a flat surface but I always like have a bit of soul or good feeling attached to them. Put one on your desk and when things get rough, look over at her and share a smile like you would do with a good friend who knows you well. 

I use crochet because I like it, I'm good at it and it's a fairly inexpensive medium.

My friend has a point. Because I am not making stuffy playthings (amigurumi)) for the baby and making things that will sit out on desks or shelves, crochet isn't for every environment. Dust is not easy to get out of the hair. 

Should I Try to Make Them Out of Clay?
I've had a really productive few days with the dolls in progress but will have to slow down because my little one is fascinated with the beads I am using to embelish them and I don't want to keep bringing them out and not letting her play. In a few days, she and my hub will go out without me and I'll get back to finishing up my last three dolls. 

BUT, I'm tempted to go to the cfraft store and buy some clay and try my hand at sculpting a figurine version.

This is either the beginning of a really good idea or ...well....

Thanks for stopping by. I know that there are a lot great blogs out there on the net and the fact that you waste any of your time on my ramblings, is really significant to me.

Peas,
Dee

Sunday, June 26, 2011

The Tooth Fairy or What you doodle while recovering from dental surgery..

The Tooth Fairy arrived quite unexpectedly in my sketchbook today. I was brainstorming. I'm trying to figure out how to draw a cartoon-like version of the dolls I crochet. I was growing frustrated when I started thinking about the Tooth Fairy.

Remember when we were kids and it didn't hurt when we lost a tooth and we were rewarded by the fairy of myths for our lost little chompers?

Too bad that as an adult when you get a tooth pulled (wisdom my foot!) it hurts like hell and there is no winged lady with money for your loss. 

I don't know when I stopped believing in the Tooth Fairy, only that right now I wish I had one. Maybe the drawing will suffice.


Peas and mashed potatoes (all I can eat right now),
Dee

Tuesday, June 21, 2011

So, What Am I Going to Do About it?... Dolls in Progress

In today's post, I'll share a bit about why I think I was having a hard time crocheting and what I plan to do about it. I hope that my experiences might help someone else who may be having muse problems.

Okay, last post I was a bit nonplussed. I wanted to crochet but I wasn't getting the results I wanted nor taking the time I wanted. I blamed my muse. You know that infamous mythical woman that we who would be artist are taught to blame things on when we aren't being productive? I gave my muse a hard time. But if the muse is supposed to be a friend and a supporter, I thought, how dare I be so critical of her? I sat down and I reassessed my problem. And then, after writing that post about the doll I wasn't going to finish. I did this:

I started two dolls, completing their basic structure and their hair (the most difficult part) in a night. This was a feat not just because I wasn't feeling particularly crafty, but also because I was (and still am) in immense mouth pain. Turns out that I had to have some wisdom teeth pulled among a host of other painful procedures. And after really reflecting, I think part of my crafty difficulties arose from my denial of the pain I was in. I'm used to doing a million things at once --- working full time, mothering, wife-ing (I know, I know, but you get what I mean), friending, writing, reading, and every other ing I could pack in.

But, dear friends, let me tell you if you don't already know, not paying attention to how your body feels will only work for so long. Eventually it will give out on you, make you rest, make you take stock of what's important.

Good thing is, now I think I can go back to doll making. I'm even inspired to try a few things.
I don't work from a pattern for the dolls. I usually just crochet in a spiral, increasing and decreasing where it feels right. For these two dolls, that I began out of frustration --- I just wanted to get a doll done in my rut -- I used two of my favorite skin tone yarns and basic black yarn for the body and wig. The wigs are actually a frogged hat. While similar, these dolls are differently shaped. Most notably from the side they have different bust shapes. I like each of them. I have plans to embellish them each with beads, ribbon and embroidery to enhance them. New territory for me. I usually just give them some earrings and maybe a necklace. I've got big plans for these dolls. I have a third doll with a lighter skin tone on the hook right now. Once she's done, I'll embellish all three. And hopefully have the first dolls for my new crafty business endeavors. (No more custom orders for awhile)

And what about the weird doll I posted about last? I dug her out of the scrap box (am I the only one with a scrap box for crochet?) and also dug out another failed experiment. Here they are in their ugly glory.


Putting them side by side made it easy for me to see what I didn't like about them! They have the same problems even though they have very different appearances.

  • Problem 1 - Eye size. I use standard safety eyes in my dolls. Apparently I only like the really small ones. Lesson learned.
  • Problem 2 - Body Shape. All my dolls have boobs, or at least a breast ridge. Neither of these do. They are both oddly conical and straight up and down.
  • Problem 3 - Hair issues. Both dolls have hair that I have used on other dolls and loved. But I hate (yep, the H word) both of their wigs. After really looking at them I noticed that I had sewn their hair too far back on the head. These dolls have too much forehead. Plus, each wig is too thin. I like my dolls to have big lush afros. Neither of these do.

So, what am I going to do with the two uglies? After much debate (with myself), I've decided to unravel them both and reuse the yarn and stuffing. I can't salvage them because of the eyes. I don't think I'll ever like those eyes.

The next few posts will be progress posts for the three new dolls. Wish me luck.

Peas and carrots,
Dee
Related Posts with Thumbnails